百度地图API-给自定义覆盖物添加事件方法
本文章简单的介绍了一下关于百度地图的应用,这里我介绍一个功能就是在自己定的层上给加个事件方法,有需要的参考一下。
给marker、lable、circle等Overlay添加事件很简单,直接addEventListener即可。那么,自定义覆盖物的事件应该如何添加呢?我们一起来看一看~
-----------------------------------------------------------------------------------------
一、定义构造函数并继承Overlay
// 定义自定义覆盖物的构造函数
function SquareOverlay(center, length, color) {
    this._center = center;
    this._length = length;
    this._color = color;
}
// 继承API的BMap.Overlay
SquareOverlay.prototype = new BMap.Overlay();
二、初始化自定义覆盖物
// 实现初始化方法
SquareOverlay.prototype.initialize = function (map) {
    // 保存map对象实例
    this._map = map;
    // 创建div元素,作为自定义覆盖物的容器
    var div = document.createElement("div");
    div.style.position = "absolute";
    // 可以根据参数设置元素外观
    div.style.width = this._length + "px";
    div.style.height = this._length + "px";
    div.style.background = this._color;
    // 将div添加到覆盖物容器中
    map.getPanes().markerPane.appendChild(div);
    // 保存div实例
    this._div = div;
    // 需要将div元素作为方法的返回值,当调用该覆盖物的show、
    // hide方法,或者对覆盖物进行移除时,API都将操作此元素。
    return div;
}
三、绘制覆盖物
// 实现绘制方法
SquareOverlay.prototype.draw = function(){
// 根据地理坐标转换为像素坐标,并设置给容器
    var position = this._map.pointToOverlayPixel(this._center);
    this._div.style.left = position.x - this._length / 2 + "px";
    this._div.style.top = position.y - this._length / 2 + "px";
}
四、添加覆盖物
//添加自定义覆盖物
var mySquare = new SquareOverlay(map.getCenter(), 100, "red");
map.addOverlay(mySquare);
五、给自定义覆盖物添加事件
1、显示事件
SquareOverlay.prototype.show = function () {
    if (this._div) {
        this._div.style.display = "";
    }
}
添加完以上显示覆盖物事件后,只需要下面这句话,就可以显示覆盖物了。
mySquare.show();
2、隐藏覆盖物
// 实现隐藏方法
SquareOverlay.prototype.hide = function () {
if (this._div) {
this._div.style.display = "none";
}
}
添加完以上code,只需使用这句话,即可隐藏覆盖物。
mySquare.hide();
3、改变覆盖物颜色
SquareOverlay.prototype.yellow = function(){
 if (this._div){
    this._div.style.background = "yellow";
 }
}
上面这句话,是把覆盖物的背景颜色改成黄色,使用以下语句即可生效:
mySquare.yellow();
“第五部分、给覆盖物添加事件”小结:
我们在地图上添加了一个红色覆盖物,然后分别添加“显示、隐藏、改变颜色”的事件。示意图如下:
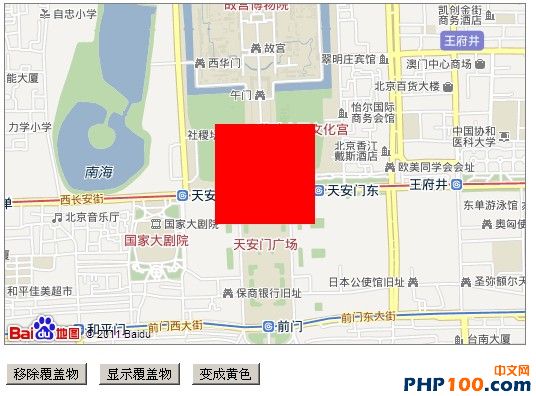
那么,我们需要在html里,先写出map的容器,和3个按钮。
<div style="width:520px;height:340px;border:1px solid gray" id="container"></div>
<p>
<input type="button" value="移除覆盖物" onclick="mySquare.hide();" />
<input type="button" value="显示覆盖物" onclick="mySquare.show();" />
<input type="button" value="变成黄色" onclick="mySquare.yellow();" />
</p>
然后,在javascript中,添加这三个函数:
// 实现显示方法
SquareOverlay.prototype.show = function () {
    if (this._div) {
        this._div.style.display = "";
    }
}
// 实现隐藏方法
SquareOverlay.prototype.hide = function () {
    if (this._div) {
        this._div.style.display = "none";
    }
}
//改变颜色的方法
SquareOverlay.prototype.yellow = function () {
    if (this._div) {
        this._div.style.background = "yellow";
    }
}
六、如何给自定义覆盖物添加点击事件(这章重要!很多人问的)
比如,我们给自定义覆盖物点击click事件。首先,需要添加一个addEventListener 的事件。如下:
SquareOverlay.prototype.addEventListener = function(event,fun){
    this._div['on'+event] = fun;
}
再写该函数里面的参数,比如click。这样就跟百度地图API里面的覆盖物事件一样了。
mySquare.addEventListener('click',function(){
    alert('click');
});
同理,添加完毕addEventListener之后,还可以添加其他鼠标事件,比如mouseover。
mySquare.addEventListener('mousemover',function(){
    alert('鼠标移上来了');
});
七、全部源代码
自定义覆盖物
<!DOCTYPE html>
<html>
<head>
<meta http-equiv="Content-Type" content="text/html; charset=utf-8" />
<title>自定义覆盖物的点击事件</title>
<script type="text/javascript" src="http://api.map.baidu.com/api?v=1.2"></script>
</head>
<body>
<div style="width:520px;height:340px;border:1px solid gray" id="container"></div>
<p>
<input type="button" value="移除覆盖物" onclick="mySquare.hide();" />
<input type="button" value="显示覆盖物" onclick="mySquare.show();" />
<input type="button" value="变成黄色" onclick="mySquare.yellow();" />
</p>
</body>
</html>
<script type="text/javascript">
var map = new BMap.Map("container"); // 创建Map实例
var point = new BMap.Point(116.404, 39.915); // 创建点坐标
map.centerAndZoom(point, 15); // 初始化地图,设置中心点坐标和地图级别。
//1、定义构造函数并继承Overlay
// 定义自定义覆盖物的构造函数
function SquareOverlay(center, length, color) {
    this._center = center;
    this._length = length;
    this._color = color;
}
// 继承API的BMap.Overlay
SquareOverlay.prototype = new BMap.Overlay();
//2、初始化自定义覆盖物
// 实现初始化方法
SquareOverlay.prototype.initialize = function (map) {
    // 保存map对象实例
    this._map = map;
    // 创建div元素,作为自定义覆盖物的容器
    var div = document.createElement("div");
    div.style.position = "absolute";
    // 可以根据参数设置元素外观
    div.style.width = this._length + "px";
    div.style.height = this._length + "px";
    div.style.background = this._color;
    // 将div添加到覆盖物容器中
    map.getPanes().markerPane.appendChild(div);
    // 保存div实例
    this._div = div;
    // 需要将div元素作为方法的返回值,当调用该覆盖物的show、
    // hide方法,或者对覆盖物进行移除时,API都将操作此元素。
    return div;
}
//3、绘制覆盖物
// 实现绘制方法
SquareOverlay.prototype.draw = function () {
    // 根据地理坐标转换为像素坐标,并设置给容器
    var position = this._map.pointToOverlayPixel(this._center);
    this._div.style.left = position.x - this._length / 2 + "px";
    this._div.style.top = position.y - this._length / 2 + "px";
}
//4、显示和隐藏覆盖物
// 实现显示方法
SquareOverlay.prototype.show = function () {
    if (this._div) {
        this._div.style.display = "";
    }
}
// 实现隐藏方法
SquareOverlay.prototype.hide = function () {
    if (this._div) {
        this._div.style.display = "none";
    }
}
//5、添加其他覆盖物方法
//比如,改变颜色
SquareOverlay.prototype.yellow = function () {
    if (this._div) {
        this._div.style.background = "yellow";
    }
}
//6、自定义覆盖物添加事件方法
SquareOverlay.prototype.addEventListener = function (event, fun) {
    this._div['on' + event] = fun;
}
//7、添加自定义覆盖物
var mySquare = new SquareOverlay(map.getCenter(), 100, "red");
map.addOverlay(mySquare);
//8、 为自定义覆盖物添加点击事件
mySquare.addEventListener('click', function () {
    alert('click');
});
</script>
八、感谢大家支持!
API常见问题总结贴:http://tieba.baidu.com/p/1147019448
本文地址:http://www.phprm.com/frame/php1005243.html
转载随意,但请附上文章地址:-)